Butt Welding and the different types of chamfers
When welding thick parts (plates or pipes) together, the weld must be made over the total thickness of the part to ensure the mechanical continuity of the assembly. To achieve this, a chamfer is made on the surfaces of the elements to be joined before they are welded together.
Butt welding on pipes is special because the welder usually does not have access to the inside of the weld. Therefore, all welding must be done from the outside, and therefore the edges must be prepared accordingly.
The various welding standards generally give the instructions to be followed regarding in terms of bevel geometry.
This article describes the preparations most common in the industry, depending on the wall thickness of the pipes to be welded together.
Formation of a chamfer on a pipe end

1. Chamfering
Chamfering is the operation for creating a flat beveled surface on the end of the pipe. The opening created by the chamfer gives the welder access to the total thickness of the pipe wall and allows him to make a uniform weld that ensures the mechanical continuity of the assembly. A root pass is made at the base of the chamfers, which is the basis for filling the groove angle formed by the two chamfers. formed by the two chamfers by successive weld passes.
2. Facing
Facing is the term used for the operation to create a land, which consists of making a flat surface on the end of the pipe. Proper facing makes it easier to align the pipes before welding and also helps maintain a constant root gap between parts, as well as a constant gap between parts. These are both essential parameters for maintaining correct weld flow and for ensuring that the root layer is fully penetrated into the weld.
3. Inside counterbore
Manufacturing tolerances of pipes can result in different thicknesses across the circumference of the pipe. This can lead to variations in the thickness of the ground plane when the chamfer is made. Therefore, counterboring is generally recommended in welding procedures. Machining involves light machining of the inner surface of the pipe to ensure that the land or ground plane has a constant width across the entire circumference of the pipe. A constant land width makes it easier to apply the root pass. This parameter is essential when automated welding processes are used because a machine is unable to assess and compensate for every possible irregularity on the land, which is obviously not the case with manual welding.
The different types of chamfers
Range of thicknesses t ≤ 3mm: If butt welding is required for pipes with wall thicknesses less than 3mm, chamfering the end of the pipe is generally not necessary. Arc welding technologies are capable of passing through the full depth of pipe in one pass.

When an automated welding technique is used (orbital welding or a process with high sources), the end of the pipe must be faced to ensure that the weld edges are perfectly perpendicular. Depending on the application or process used, the gap between sections will be between g=1/2t and g=0 (especially for processes with high-density energy sources).
Thickness range 3 ≤ t ≤ 20 mm: For wall thicknesses greater than 3 mm, the weld metal generally cannot fully penetrate, and a chamfer must be made so that the welder can create a root pass at the bottom of the weld, which is then filled by one or more additional weld passes. The root pass is made with a weld process that provides the best possible burn-in (the root pass is used as a base for the subsequent welds).
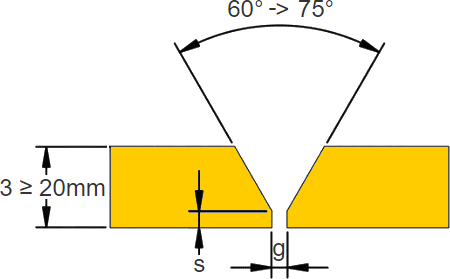
The most common angles for V-grooves are 60° and 75°, depending on the welding process to be applied. Generally, a land is required with a certain width, and a gap between the parts to be welded. Both depend on the welding process and the welder himself.
However, certain thicknesses more often require "J" groove preparations (see details below). This is especially the case when orbital welding processes are used, and is also the normal type of preparation when welding alloys such as duplex or inconel.
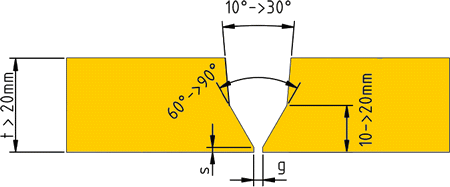
Range of Thicknesses 20mm ≤ t: As the wall thickness of the parts to be welded increases, the amount of weld metal to be deposited in the weld bead increases accordingly. To prevent welding operations from being too long and too expensive from the point of view of labor and consumables, preparations for weld joints with thicknesses greater than 20mm should be made using chamfers that allow the total volume of the chamfer to be reduced.
Double-angle V-grooves (or compound V-grooves): The first solution for reducing the bevel is to change the groove angle. An initial angle of 30° or 37.5° is combined with a second angle, usually between 5° and 15°. The initial angle of 30° or 37.5° must be maintained to prevent the groove from becoming too narrow and preventing the welder from making the root pass.
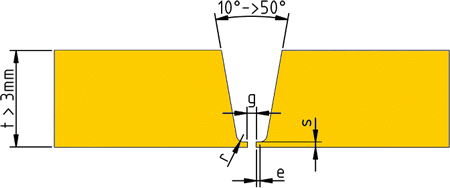
Single and Double Angle J Grooves: The second solution to drastically reduce the volume of the chamfer and, therefore, the amount of weld metal metal in the preparation of the J-groove. Single angle "J" grooves consist of an angle normally between 5° and 20°, a groove radius (r) and a land elevation (e). The latter element makes the root pass easier to do by giving the welder better access to the land.
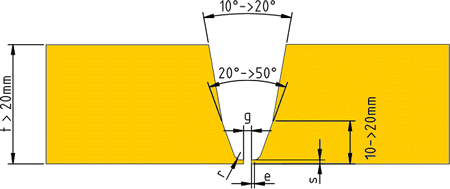
For enclosures with very thick walls, "J" grooves can be made with a compound angle. Normally, the first angle is made at 20° and the second at 5°. "J" or compound "J" grooves are usually welded with a very small or zero gap (g) between sections.
Remark(s) of the Author...
Proper Bevel
The question that arises is how can a proper bevel be realized?
Chamfering for range of thicknesses t ≤ 3mm can be done relatively quickly with a grinder. The same for chamfer thickness range 3 ≤ t ≤20mm, up to certain diameters. Let's say that up to NPS 6 manual machining with a grinder is well manageable, if the wall thickness is not thicker than about 10mm. For all other chamfers described in this article, a professional bevel machine is preferred.
Information on bevel machines will be available soon in the Others Menu under Piping Tools.
Related Post(s)
Shell has successfully installed the first 3D printed leak repair clamp in service...